Introduction
Over the years, I have worked on a wide range of hardware and software projects, each with its own unique stories and valuable lessons. Unfortunately, I haven't documented many of them.
Now that I have some downtime and feel more or less satisfied with the current state of this project, I'd like to delve into the experience of creating a simple blogging engine and share some of the things I learned along the way. This engine handles Markdown and assets, deploys itself from a GitHub repo to a VM on one of my servers, generates an RSS feed, includes a custom API, and comes with a separate analytics platform and dashboard to track visitors.
There were some features that I really wanted, so before deciding to build my own, I went on a quest to find the ideal blogging solution:
- Simple and clean design
- Markdown support
- Access to anything within three clicks, with no dropdowns
- Free and self-hosted
- Streamlined interface prioritizing content
- No sidebars or annoying email prompts
- Customizable themes
- Analytics integration
I tried out some of the biggest platforms and was really disappointed with most of them:
- WordPress: An old, bloated and clunky PHP + SQL nightmare. Easy to use but more of an all-purpose CMS than a simple blog. I used to have a self-hosted instance with the Divi framework running for a long time, but it required a lot of jQuery monkey-patching to tweak simple styles, and at the end of the day, it was limited and unmaintainable.
- Ghost: Feels like WordPress if it were a blogging platform instead of a CMS. By far, the worst documentation and theme support. Everything feels designed to nudge you into buying one of their very limited creator plans. Boring and uninspired.
- Hugo: By far the best one I tested, similar to GitHub Pages or Jekyll. I almost chose it, but after considering the effort required to tweak an existing theme versus writing one from scratch and the limitations of fully static sites, I was not fully convinced.
- Medium: The absolute worst offender on this list. Ugly interface, proprietary, lots of dark patterns, and sign-up prompts. I really don't understand why anyone would ever use this.
- Substack: Similar to Medium and currently trending, it's essentially a newsletter platform repurposed as a blog, where dimwits flock to monetize their inane thoughts.
Failing to find anything acceptable and suffering from an acute case of Not Invented Here(NIH) syndrome, the idea of writing one made a lot more sense.
 This is basically how the process went
Design Considerations and Tech Stack
After fully committing to the DIY approach, I chose Angular because I had experience with it and wanted to use its built-in features. In hindsight, Next.js would probably have been the best option, but I had no experience with React at the time 😞.
Angular offered full SPA support, which was perfect for the initial version since I wanted to build both a blog and an analytics dashboard in one app. However, after creating the first prototype, I decided to split the projects and implement a common API between them, which several other projects now use.
For the CSS, I decided to go with Bulma, adding custom styling and some animations for more complex components. I wanted a mobile-first approach, and it seemed like the perfect fit. The main font is Lato for its modern, clean look, while some menus use Helvetica to add a classic touch.
A key feature I needed was portability, with each post stored as a self-contained folder within the public/posts directory. These folders follow a content-asset layout, containing regular markdown files and images. They are linked through a post-list.ts file, which exports a POSTLIST constant that includes all available post information as an array of JSON objects. These objects include the relative paths of the assets and post metadata, such as the author, date, privacy settings, and various images including Open Graph and RSS thumbnails.
The POSTLIST is imported by the main app to render post cards on the home screen, display their content in the blog component, and generate the category list. Additionally, during the build stage, the RSS generator uses it to detect and add new posts to the feed. Posts marked with the isPrivate flag will be excluded from both rendering and RSS generation.
In terms of performance, one could argue that keeping the POSTLIST in memory and checking it each time a post is displayed might be computationally expensive. However, since I'm using SSR, all the posts are pre-rendered, reducing the need for frequent checks. Even if such checks were necessary, given the low number of posts, any potential impact would be negligible. The RSS generator runs independently on the CI server only during the build step and generates the feed once per commit, so site performance is not affected.
// Example of the post-list.ts object structure
export const POSTLIST: Post[] = [
  {
    id: 1,
    permalink: 'sx_core_testing',
    author: 'Arkandas',
    title: 'SX Core Testing',
    summary: 'Installing and testing a pre-release unit of the SX Core modchip',
    content: 'posts/1.sx_core_testing/content/sx_core_testing_content.md',
    banner: 'posts/1.sx_core_testing/assets/banner.webp',
    miniature: 'posts/1.sx_core_testing/assets/miniature.webp',
    card: 'posts/1.sx_core_testing/assets/card.png',
    date: '2020-05-20T02:00:00',
    isPrivate: false,
    categories: ['Hacking', 'Switch'],
  }
];
Components
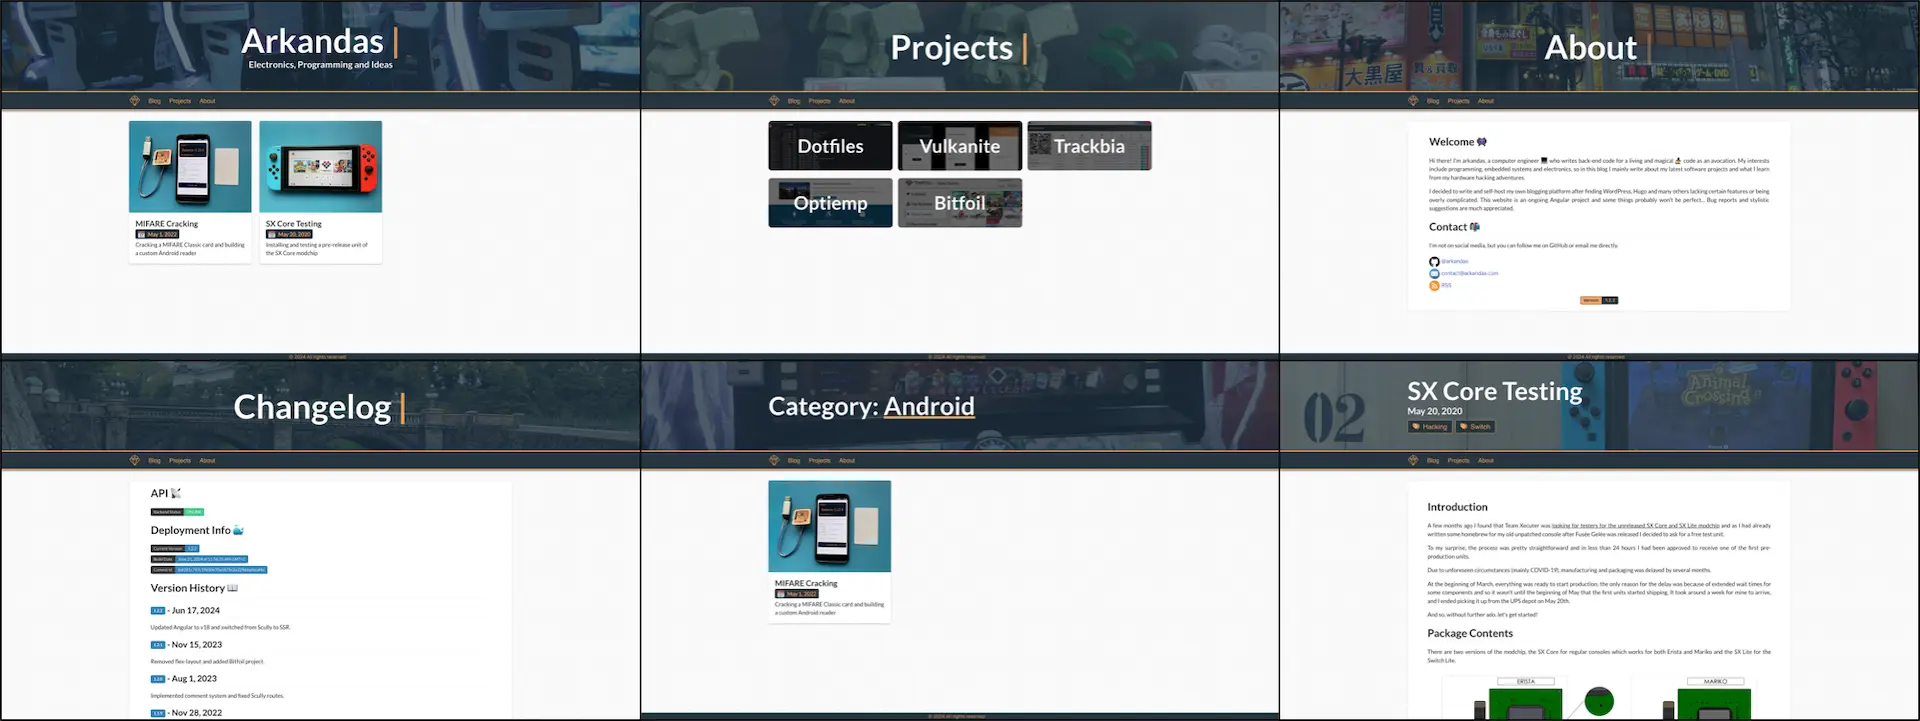 Site screenshots
To reduce complexity and improve performance, the app is divided into reusable components. There are four core components present on every page:
- Header: Displays a dynamic image and title that vary based on the page type
- Navbar: A fixed component featuring links to various pages within the application
- Content: The main section of the site, renders different components
- Footer: Another static component displayed at the bottom of every page
During page load, the header and content are always updated. The header displays type-specific data and images passed through @Input properties, and based on the page type the title font size and headings change. The content component dynamically changes the page layout based on the active route, ensuring that the correct components are rendered for each page.
There are also several services used to encapsulate and share data and logic across different components. These services include cryptography, pagination, meta tag updates and an interceptor that works during markdown generation to add anchor links to titles.
Posts, Categories, and Tags
The blog component renders posts based on their dynamic route. It matches the blog/:permalink path with the corresponding permalink property from the exported POSTLIST. Once a match is found, the relevant object is loaded, including its images and content, to populate the header and content sections of the page. Category tags are added to the header, as links to the category component.
During the component's initialization, two asynchronous API operations occur. The first sends a /pageview request, while the second attempts to load comments for the post. If both calls succeed, the comment form is displayed, and the list of user comments is rendered.
Editor
To help with writing and as a handy quality-of-life feature, I also created an integrated WYSIWYG editor. However, to keep it secure, this editor is only available in the development environment. During the CI build step, the production environment file is passed as an argument, setting the environment.production property. This excludes the editor from the router and removes the component from the final build.
// Only show the editor in development mode
if (!environment.production){
  routes.push({path: 'editor', component: EditorComponent});
}
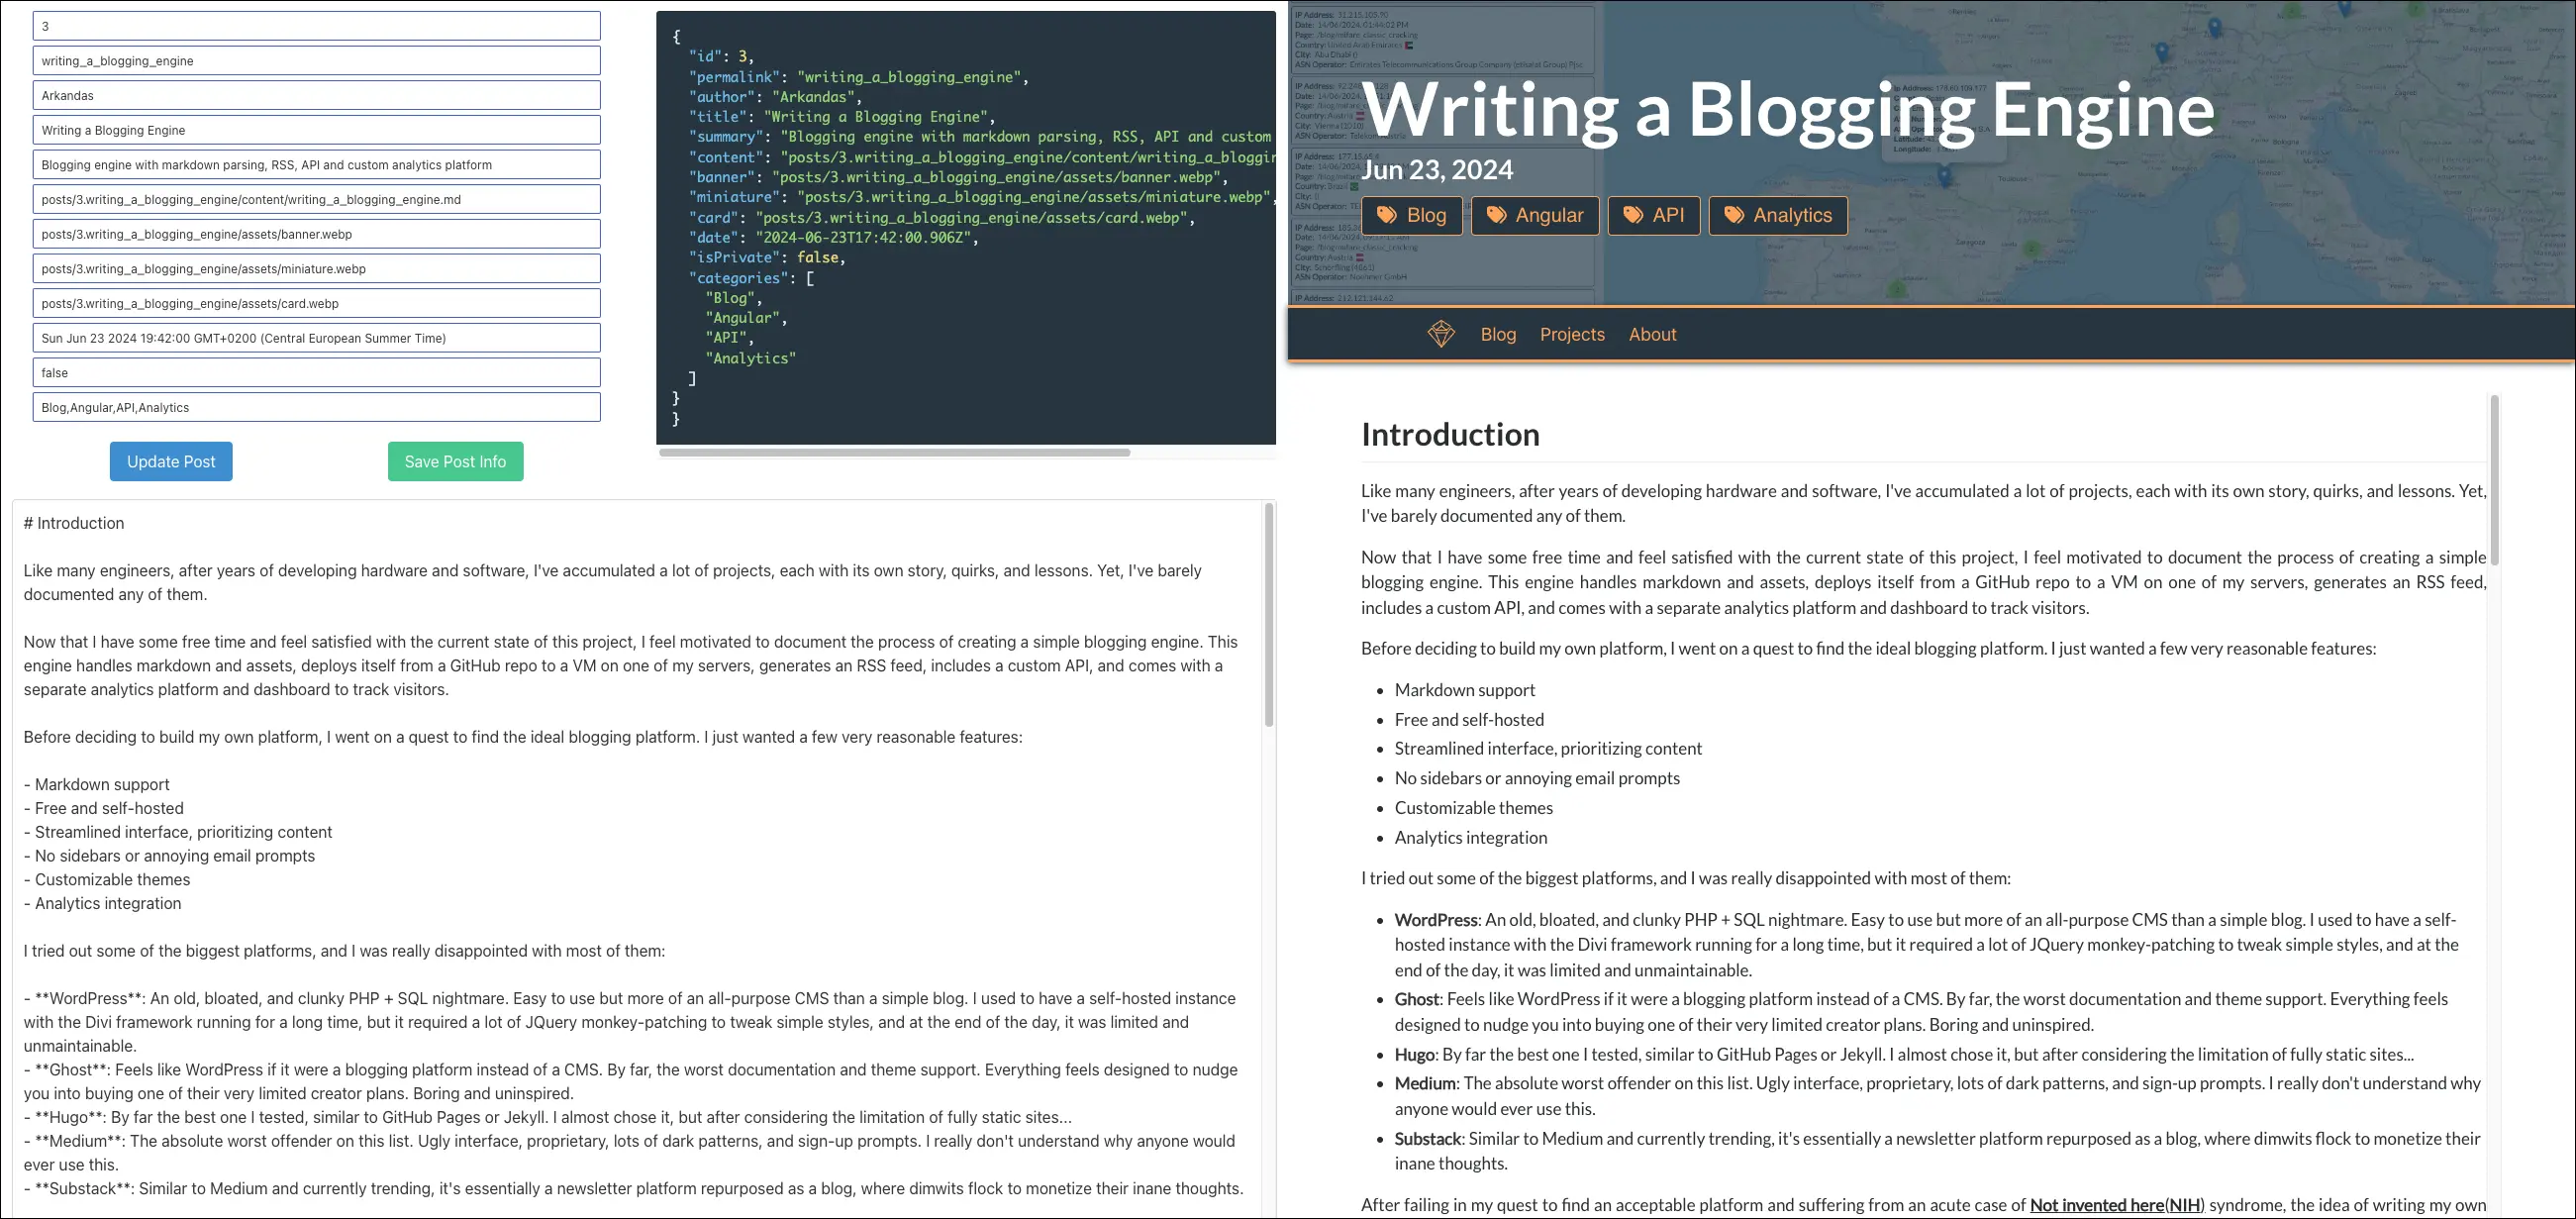 WYSIWYG development editor
This editor works similarly to the blog component, using the editor/:permalink route to import the latest draft. When a post is loaded, both its content and POSTLIST information are displayed and can be edited. The content can be updated using the Update Post button, and the POSTLIST information can be saved with the Save Post Info button. Any changes made in the editing interface are displayed in real-time on the preview pane on the right side, including text, images, and category tags.
Easter Eggs
I added a couple of Easter eggs to the app. The first is a simple debug menu, accessible in any post by pressing the d key seven times, which displays metadata.
 Debug info
The second Easter egg is a /changelog page, which can be accessed by clicking the version tag on the About page. It provides details about the API status, current app version, commit ID, and build date, along with a changeset for each version and a brief description of the changes made in each revision.
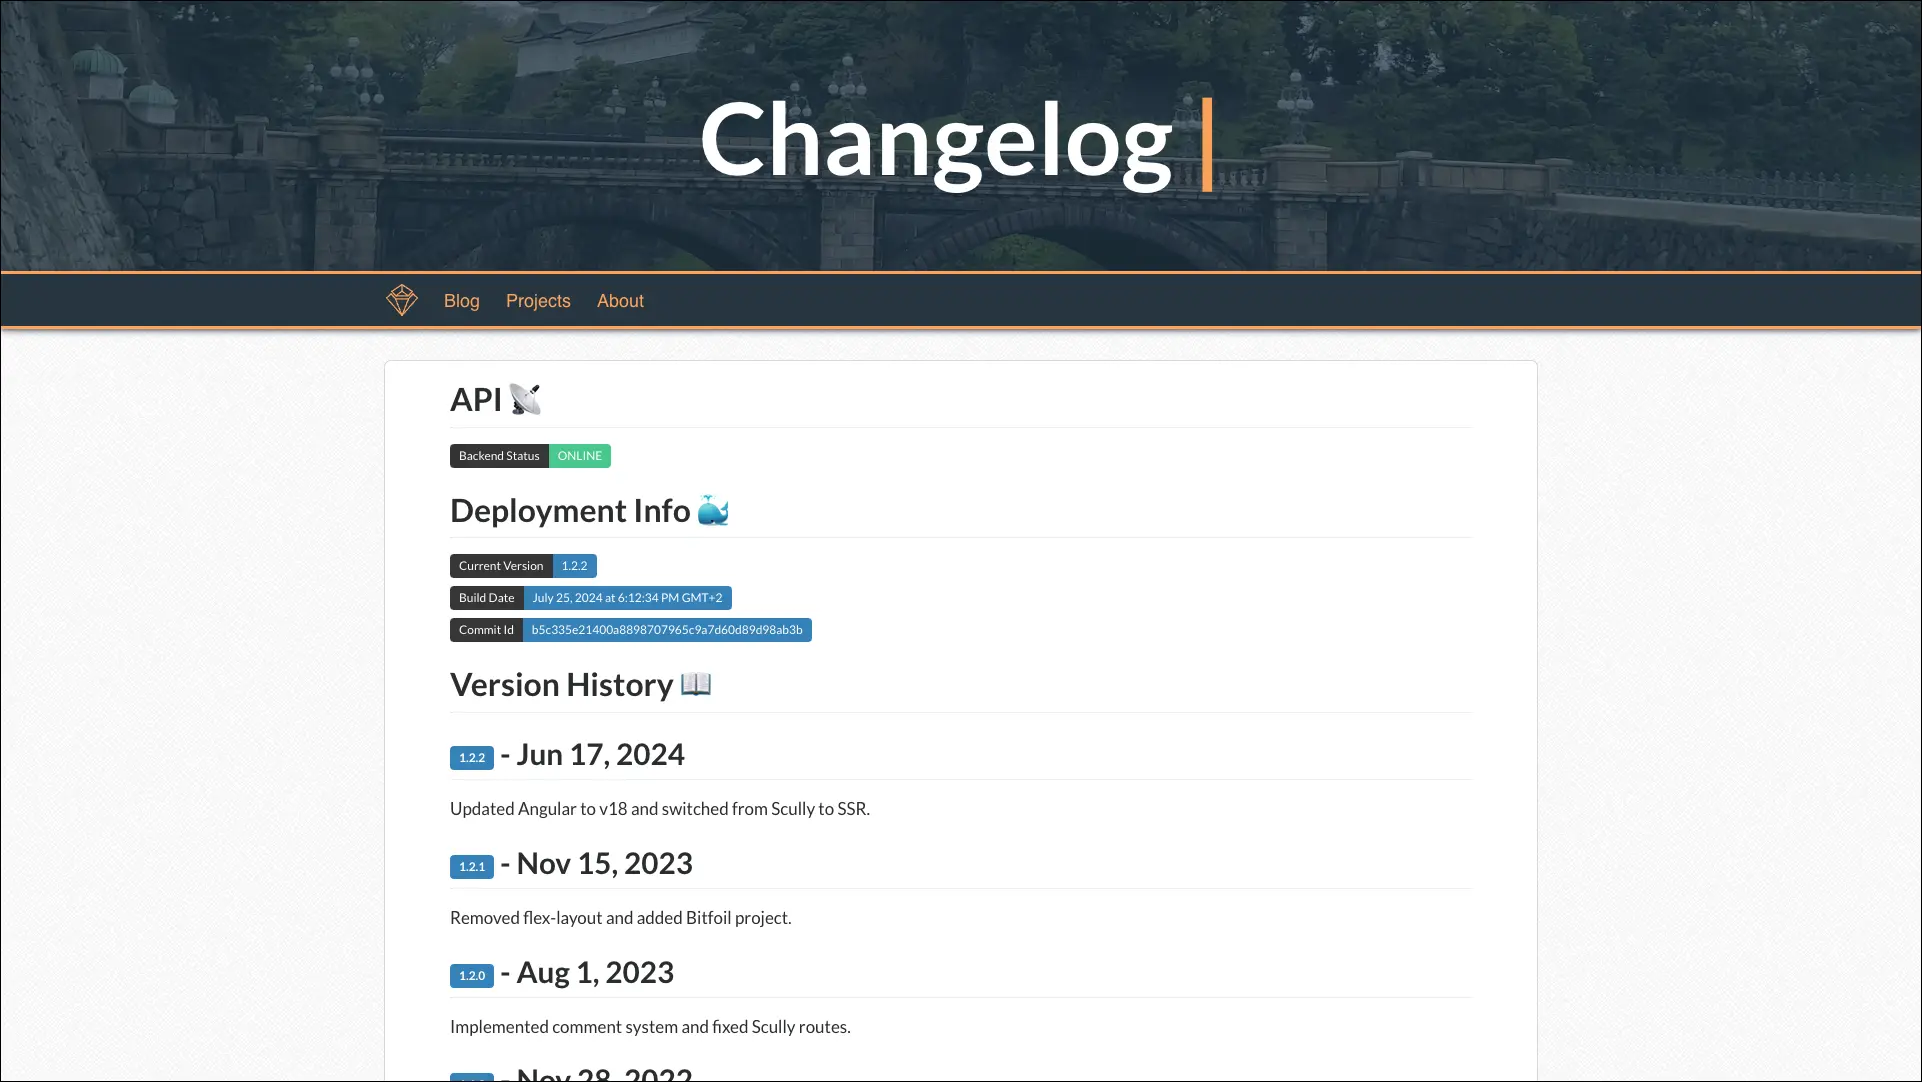 Changelog
Analytics and API
 Analytics - Login
The backend API is a straightforward Spring Boot application that handles authentication, authorization, and security using JWTs and tiered permissions. Currently, only an admin role is defined, granting full access to all dashboards. All endpoints require authorization, except for /pageview, which is public and used to log visits from external services and apps I build.
Each time a user visits a page, the sendAnonymousPageView function triggers a call to the /pageview endpoint of the remote analytics API. This request includes anonymous visitor information such as the page's full address, browser and device details, and the current date.
To mitigate malicious requests and DDoS attacks, every request is encrypted using AES-256-CBC with a hardcoded key and IV. I chose CBC mode because it is less parallelizable, and the added computational cost makes flooding the system with requests more difficult. While a determined attacker could potentially discover these secret values and generate their own requests, I believe the effort involved would likely discourage such attempts, even though the values are stored in plain text in the minimized JavaScript bundle of the app.
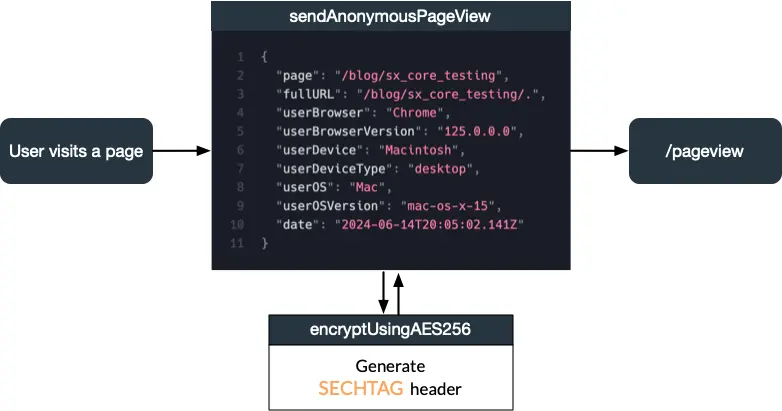 Overview of a /pageview request
When the API receives a request, it decrypts and validates the SECHTAG header using the same key and IV since AES operates as a symmetric block cipher and filters out any invalid requests. Once validated, it retrieves the origin IP from proxy headers and then calculates the likely ASN and geographic location associated with the IP from self-hosted GeoLite2-ASN and GeoLite2-CITY databases.
Page views are logged into a PostgreSQL database after confirming that there have been no previous visits to the same page from the same IP address within the last 10 minutes. Requests to different pages are logged individually. However, if a user revisits a page within a short timeframe, the request is discarded to prevent potential malicious or duplicate traffic from overwhelming the database. If an IP generates an excessive number of requests, they can be added to a ban list.
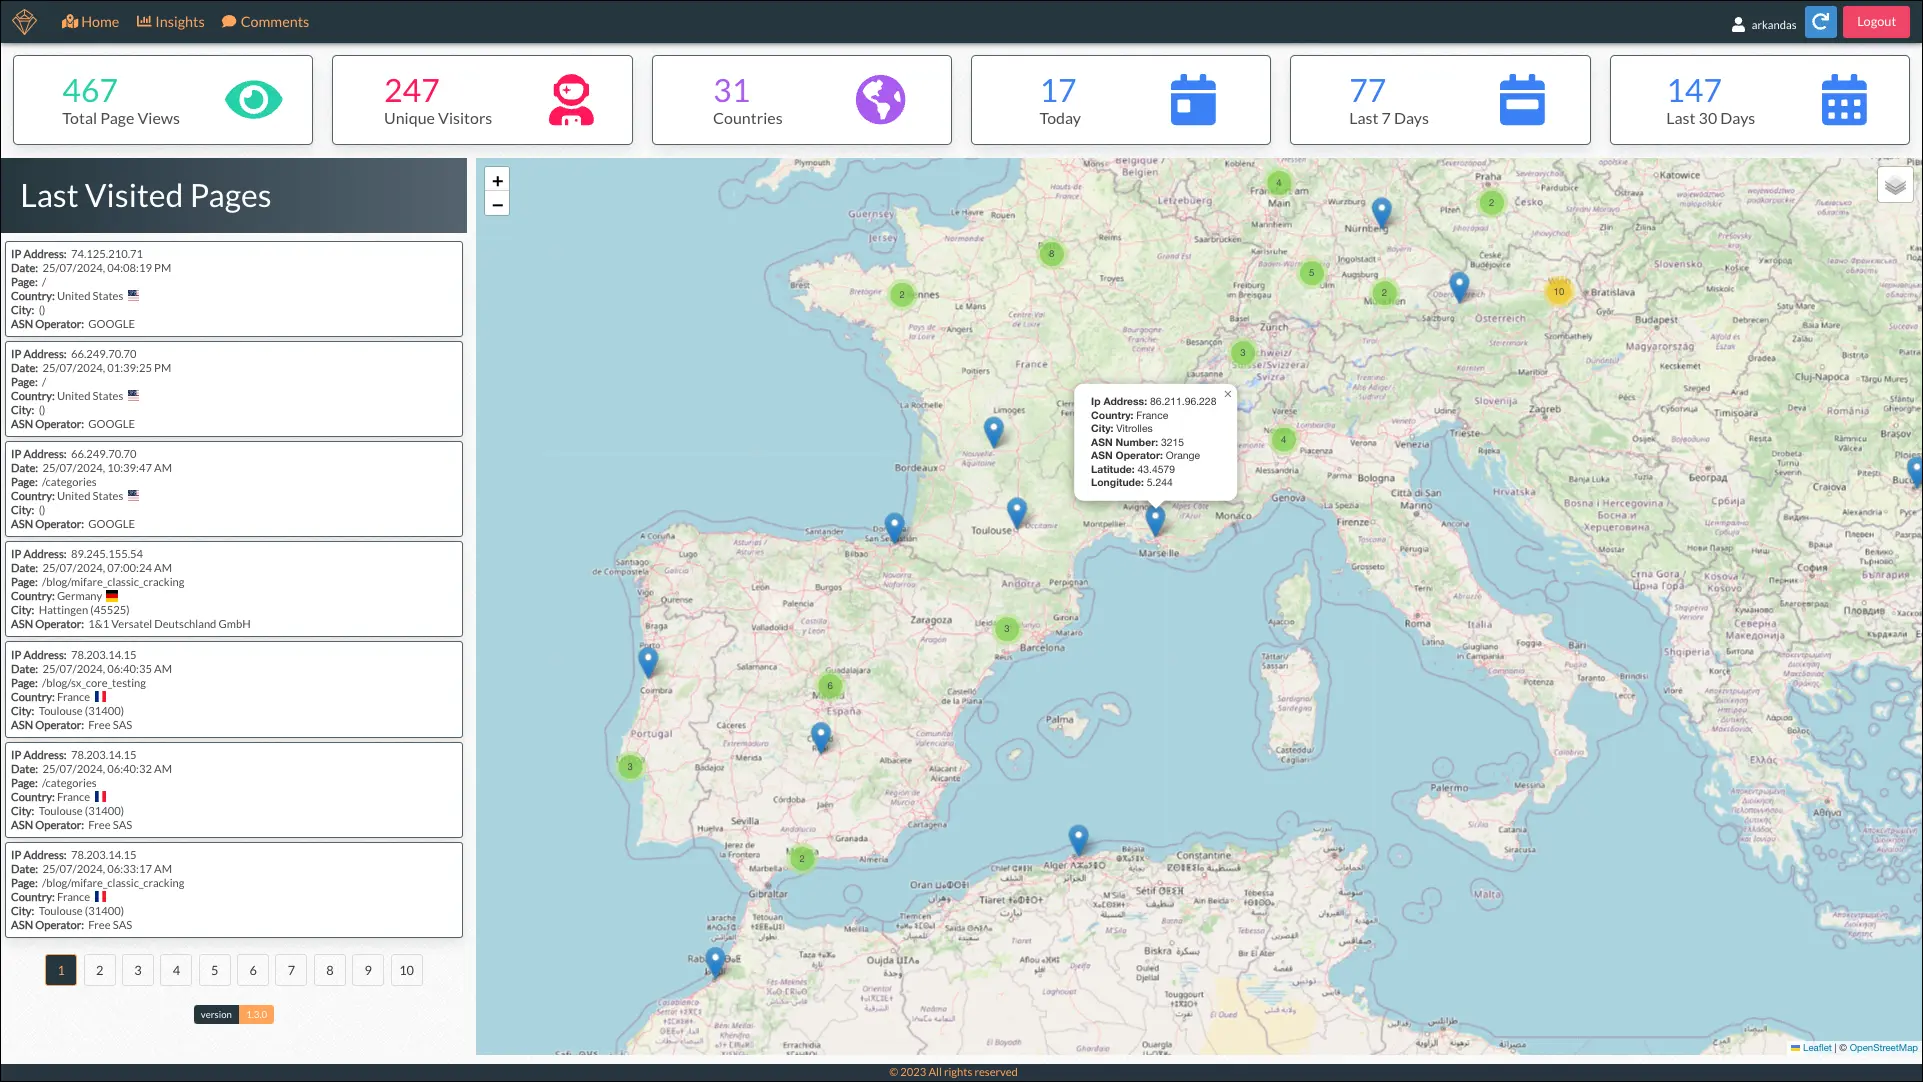 Analytics - Dashboard
All of this information can be accessed from the analytics dashboard, another Angular app that integrates Leaflet and OpenStreetMap to visualize the calculated locations of page visitors. It provides details on recent visitors and general statistics such as the total number of unique visitors, unique countries, and visits in the last day, week, and month.
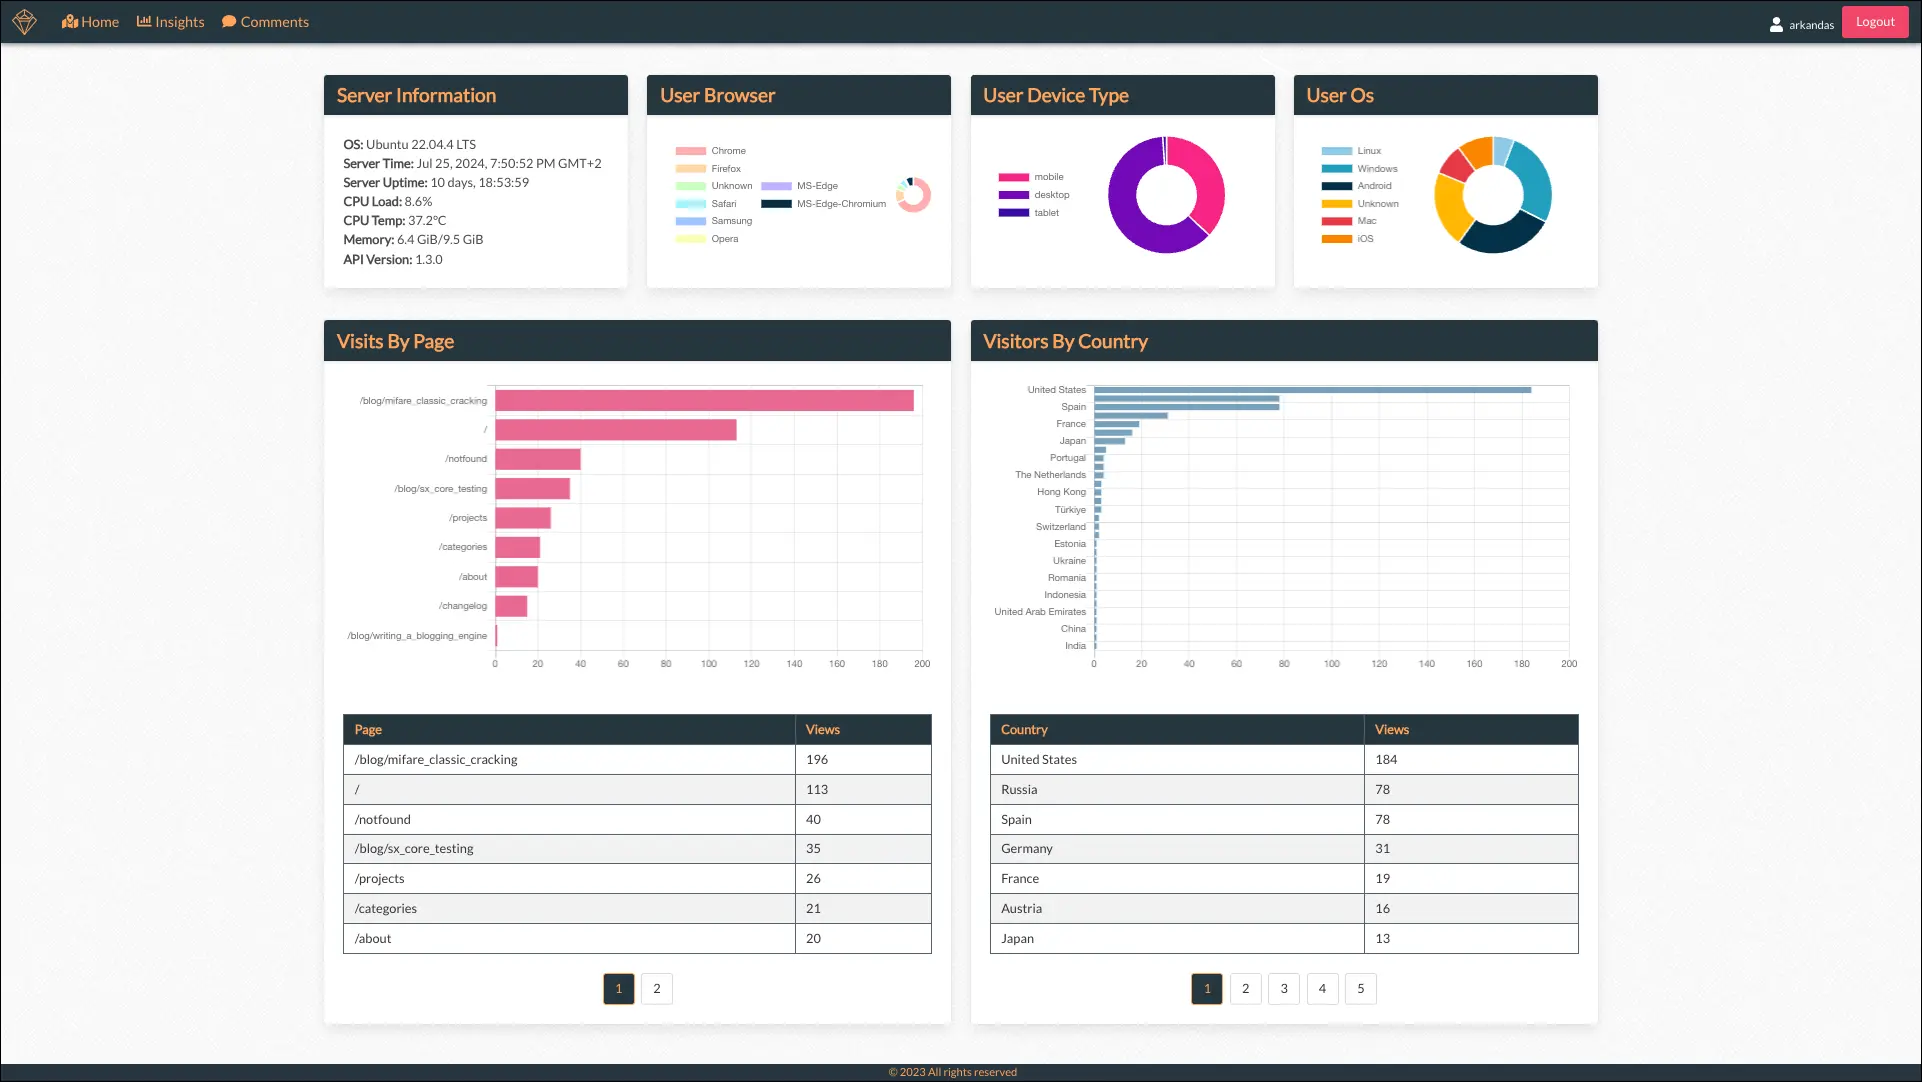 Analytics - Insights
The insights page provides more granular information, including aggregated device data such as browser, device, and operating system, as well as key metrics like page visits, visitor demographics by country, and relevant server information.
 Analytics - Comments
There is also a comment preview and validation screen. When a user submits a comment on the blog, it is sent to the backend for review and moderation before being displayed. Generally, comments can be approved or denied. If denied, users from the offending IP address will be soft banned from commenting on that post again.
Scully, SSR, and Dynamic Tags
Open Graph tags and Twitter Cards are metadata tags used to optimize content shared on social media. By adding a few lines of HTML to the <head> of a page, developers can specify details like the page title, description, image, and URL. When I first wrote the app, I didn't realize that Angular SPAs load content dynamically without refreshing the page. Since they render on the client side, crawlers and bots only fetch the root index.html file because most of them don't execute JavaScript.
This limitation affects how URLs from the page are shared on platforms like Twitter, Facebook, or WhatsApp. For example, when you share a URL from an SPA, the metadata fetched by the bot will always reflect the static content of the root page (example.com) rather than the specific page you shared (example.com/mypage). Also, most crawlers and bots have specific constraints, like requiring images to be under 600KB in size and having an aspect ratio close to 1.91:1, which is around 1200x630 pixels in most cases.
Scully
While trying to fix the metadata problem, I discovered Scully, a static site generator for Angular apps, and decided to give it a try. The idea was to pre-render each page, generating static HTML files with the correct metadata tags. The setup process was tedious, and I ran into several issues with the library:
- The Dockerfile was a nightmare, with tons of dependencies like Chromium and Puppeteer
- There were multiple redirects on page load that hurt both performance and SEO
- Pages without a trailing slash would redirect to the 404 component, so I had to add code to make sure URLs always had a trailing slash
- A separate
scully-routes.jsonfile was needed to determine which routes to pre-render - Some browser APIs I was using had to be removed because the full browser context was not available
- It required a default rendering size, which could cause the page to initially display with incorrect dimensions on some devices
Even with these challenges, Scully proved to be a reliable solution for a long time. It delivered acceptable response times and performance, ensured that metadata tags were accurately applied, and hydrated dynamic pages with client-side data.
 Enhanced sharing preview from Meta Tags
Server-Side Rendering
The decision to replace Scully with Angular SSR inspired me to write this post. I realized that Scully hadn't been updated in over two years, and I wanted to upgrade to Angular 18. I grew tired of constantly patching an abandoned project just to keep it compatible with the latest Angular version.
Angular SSR proved to be an excellent alternative to Scully. Unlike static pre-rendering, it dynamically renders pages on the server, ensuring that content is always up-to-date with every request. This approach not only enhances SEO and social media sharing by maintaining accurate metadata but also boosts performance, as fully rendered pages are delivered directly to the client.
The transition has been relatively smooth. The only extra effort required was creating a routes.txt file similar to Scully's and configuring Static Site Generation to pre-render some pages during the build process, which decreased the TTFB (Time to First Byte). The performance improvement with this change has been incredible, reducing page load times from 5-10 seconds to less than 300ms, likely due to a bug with the markdown parsing.
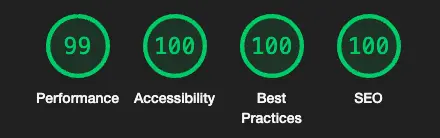 Lighthouse report after SSR
RSS Feed
After using Feedly for over ten years, and previously Google Reader (RIP 😔), I understood the importance of having a proper RSS feed for my site. I considered generating the feed manually and tested many libraries, but none could create a feed that displayed both images and a text preview of my posts correctly across different platforms.
To solve this, I created a simple RSS generator using Node.js and TypeScript. It makes a copy of the POSTLIST, filters out private posts, converts some of the markdown content to HTML, and adds miniature images. This creates a feed that works universally. I also automated everything: whenever the blog is built in Jenkins, the Dockerfile runs the feed generator, and the resulting feed.rss file is copied to the /rss folder of the project.
You can find a version of this generator here: [rss_generator.ts]
Comments
The last feature I added was the comment section. I considered using Disqus or GitHub issues with a library like utteranc.es, but I wasn't sure how much data they collected, didn't want to deal with any terms of service and preferred to avoid relying on third-party dependencies that need updates. So, I decided against using any of them.
I checked out a bunch of blogs to see how their comment sections worked. In the end, I went with a "one man, one vote" system as most comment sections, like Hackaday's, turn into either shouting matches or low-quality bait after a few replies.
During page load, an asynchronous call is made to the commentsByPage endpoint to retrieve and display the list of comments, as well as check if the user has already commented. If they haven’t, the comment form is displayed. After a user submits a comment, the backend performs an IP check to ensure it is their first submission. Once the comment is stored in the PostgreSQL database, an email notification is sent to me, and the comment appears in the analytics app awaiting moderation, where I can either approve or reject it. If rejected, the user is soft-banned from commenting again on that post, and the comment form will no longer be visible when they revisit. I also have the option to respond directly to the user’s comment from the analytics page during the approval process.
CI/CD, Hosting, and Deployment
When I start a new project, the first thing I do is set up a CI/CD pipeline using Docker Compose and Jenkins. Whenever a commit hits the main branch, the pipeline automatically kicks in, building and deploying the latest version with almost zero downtime. In a previous version, I used GitHub Actions to compile and deploy to a remote server. You can view the code for that setup in this Gist: [compile-upload-blog.yml].
Last year, I built a powerful TrueNAS + TrueCharts media and applications server to replace my aging HPE ProLiant MicroServer Gen10. This made running everything, including this blog, on my own hardware a no-brainer. The high prices for basic compute services on most cloud platforms and the concern of platform lock-in further convinced me (I swore never to use AWS again for hobby projects after receiving an unexpected $200+ bill for mysterious bandwidth charges related to data transfer to another "region").
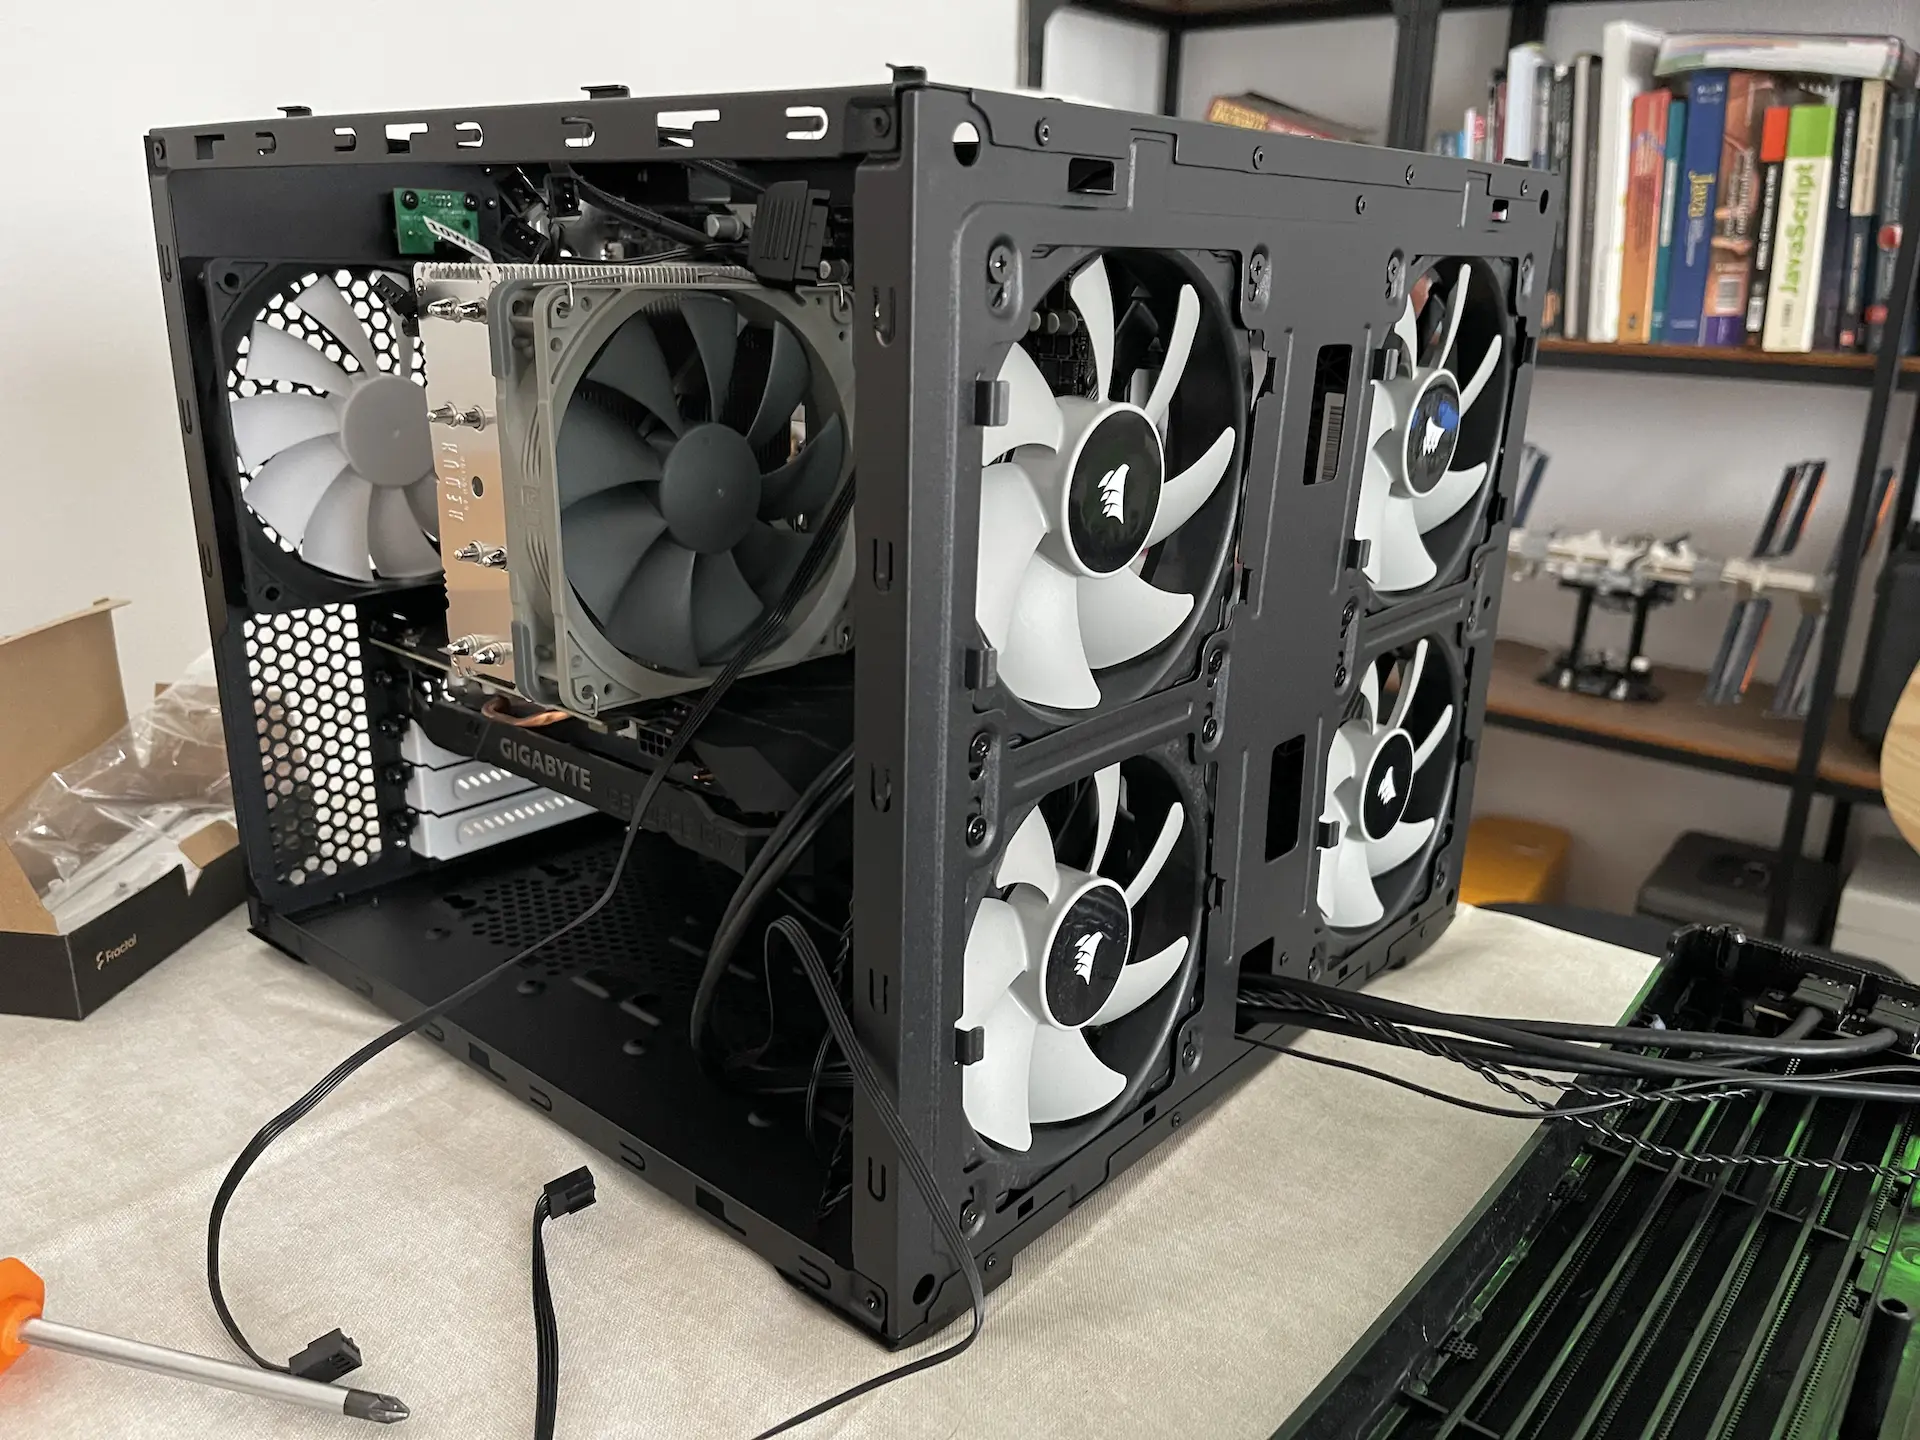
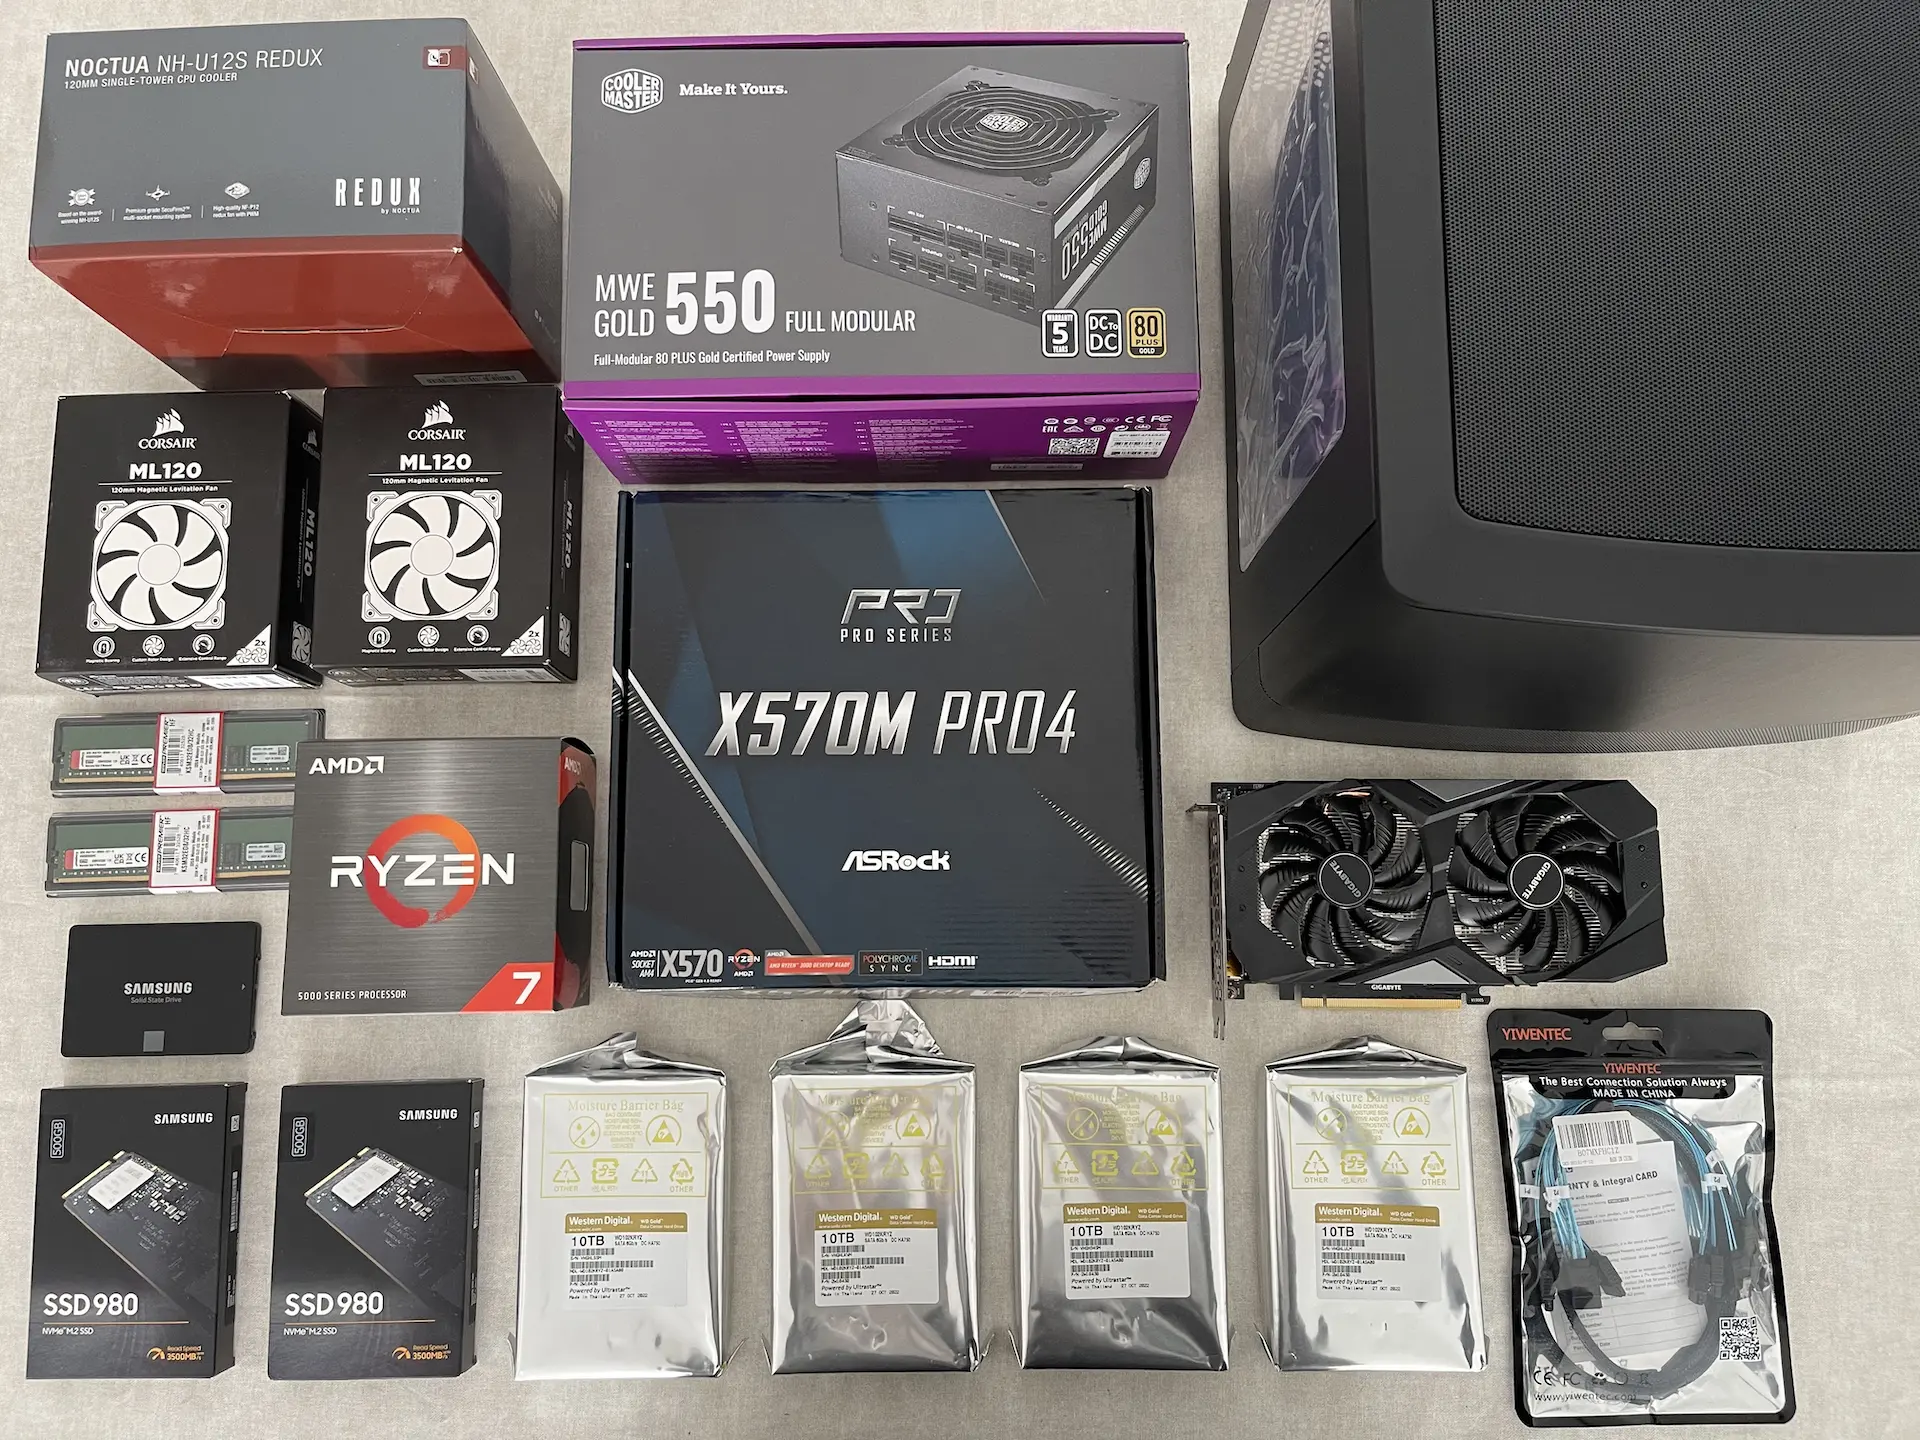 Just a small 80TB home server
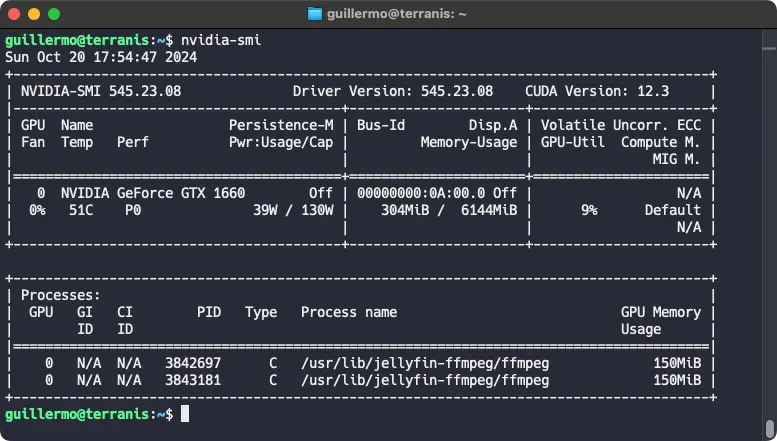 NVENC HW transcoding works with minimal setup
Applications are hosted in their own VM, with a Jenkins agent offloading building and deploying from the master node and updating the changelog page with compile information. I use a combination of Traefik and clusterissuer/cert-manager charts to route traffic from the internet and set certificates and middleware as needed. I delegated the DNS resolver from my domain registrar to Cloudflare, as it offers out-of-the-box Let's Encrypt SSL certificates with wildcard support, allowing me to register and update as many subdomains as I need directly from my NAS. I also use their CDN and content optimization features to minify and deliver large assets like images.
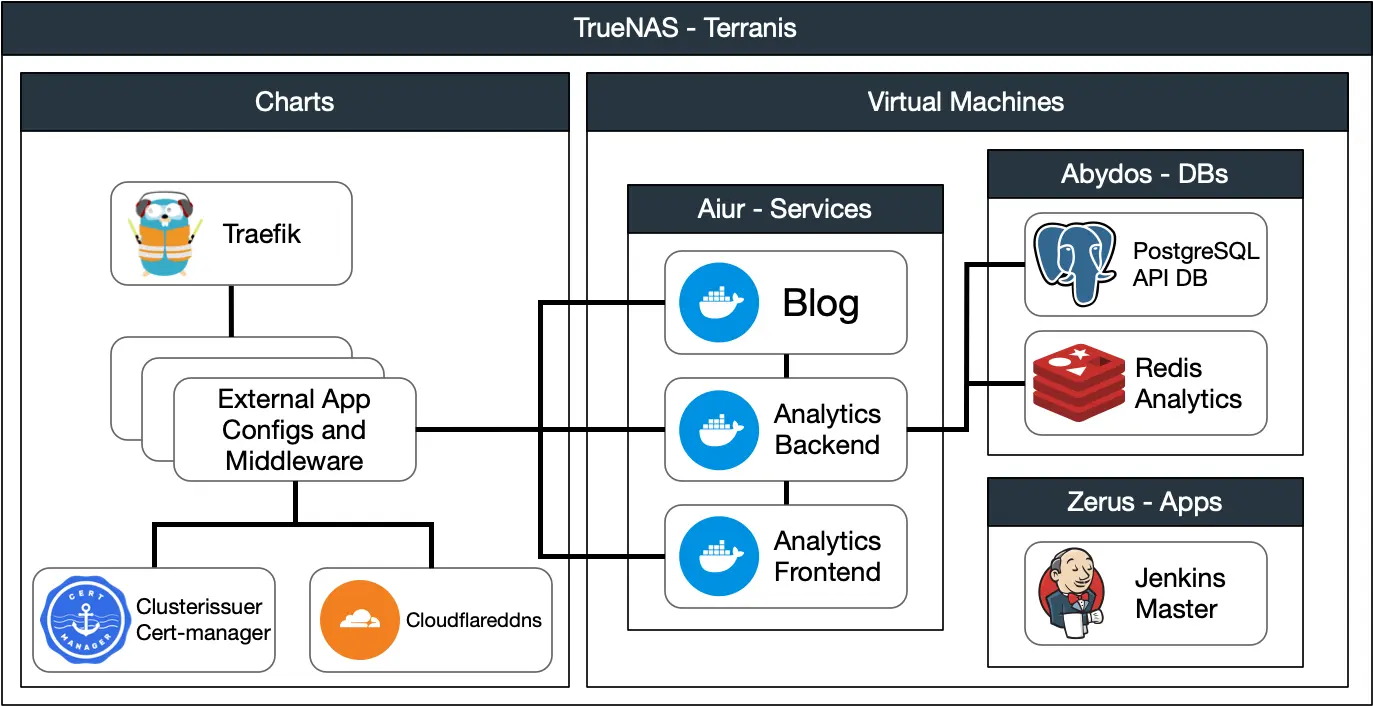 Simplified deployment diagram
For visibility, I added the domains to Google Search Console to monitor performance and click-through rates, improve SEO, and fix indexing issues.
This setup has been performing flawlessly for the better part of a year, requiring only minimal housekeeping in the form of deleting unused images from experimental branches and updating charts from time to time. I'll probably replace the K8s setup with Docker images when the next version of TrueNAS is released, but for now, it works well enough.
Conclusions
This project has taught me a lot about what makes a modern website tick and the best practices for creating a highly performant page. Here are some things I learned or remembered the hard way:
- Manually building features I took for granted, like SEO, social media tags, RSS...
- Creating icons is hard; there are a lot of sizes and unwritten conventions to display them correctly on various platforms
- The cloud is a scam (and I say this as someone who spends a lot of time fixing weird errors in AWS). It's just a small cartel of providers with very opaque pricing, not really worth it for a hobbyist
- There’s always a new feature to implement or an aspect to improve. Whenever I visit an interesting site, I take screenshots and notes of ideas that could be added to my projects or integrated into future updates.
In the end, it was all worth it. Even though it was a huge time sink, I enjoyed it immensely 😉. Now that this is done, I hope I can start consistently documenting other projects.